Do you want your ski boots to fit well? Then you'll almost certainly need to modify them in some way. Here is your guide to getting ski boots that don't hurt your feet and help your skiing.
This seems obvious, but is the first hurdle that many people fall at. Mondo point sizing is measured by foot length, so it seems simple – put a 26.5cm foot in a size 26.5 boot, right? But length is not the only dimension of a foot, and one that is quite easily changed in a boot, so don't choose based on length alone. You're looking for a boot that fits your foot closely around the heel, ankle, instep, and lower leg. After that, consider forefoot width and foot length, but keep in mind that these two are quite easy to change. A boot shell can be expanded but not contracted – trying to fill space in a too-big boot will likely not give good results.
Be aware that some shops may try to sell you a boot that is too big – it may feel comfortable to start with, but the liner will pack out (compress down) over time, giving more space for your foot to move around and making it harder for you to control your skis. This will be hard/impossible to fix. An important part of choosing a boot is doing a shell fit, comparing the shape of your foot to the shape of the boot shell.
You may find it is better to downsize (e.g. choose a 25.5 boot for your 26.5cm foot), if it fits your foot better in these other places.
After choosing a boot that best matches your foot shape, with no parts of the boot having too much space around the foot (possibly downsizing to achieve this), then unless you are lucky, there will be some places where there is not quite enough space around the foot. Now you need to modify your boots!
You could take them to a ski shop and ask them to do the work. They can be experienced at doing this, and may do an excellent job, or maybe not. You are stuck with your local options and if you judge that they are poor then it is possible to do this stuff yourself – you can have full control, iterate as many times as you want, and save money! On the other hand, if you trash your boots then you only have yourself to blame. However, if you are careful, that's unlikely to happen.
Before you start doing anything, take time to be sure exactly what you want to change. Mark places on the inside or outside of the shell (with something erasable like a pencil). Lipstick or toothpaste is useful for transferring a mark from your foot onto the shell – just take care not to smear it when inserting and removing your foot. Make sure to put your footbed in the shell, and consider the extra height the base of the liner would occupy. You can also tap on the outside of the shell to feel where that spot is on your foot – this can work well for the forefoot.
Once you have decided what to do and have your marks, you're (nearly) ready to go!
These two are really the same thing – heating the shell plastic until it softens, and then using a tool to reshape it before letting it cool. Stretches use a tool inside the shell that pushes against the other side of the shell. Punches use a tool that clamps between the inside and outside of the shell. Punches are only suitable for small areas, but can be a good choice when a very localised deformation is required, like removing pressure over a small bony protrusion.
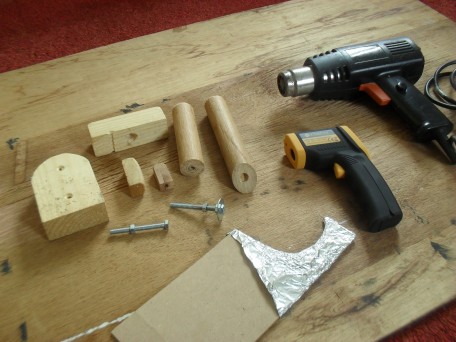
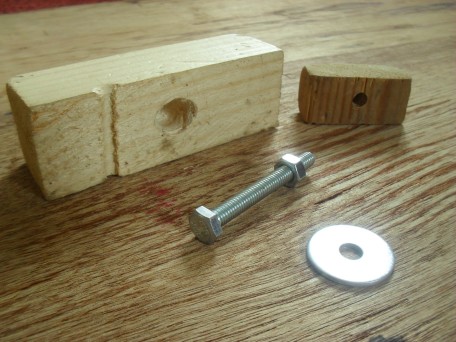
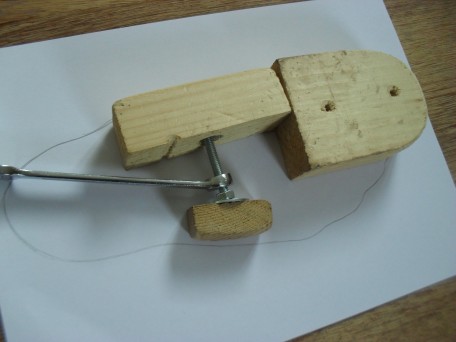
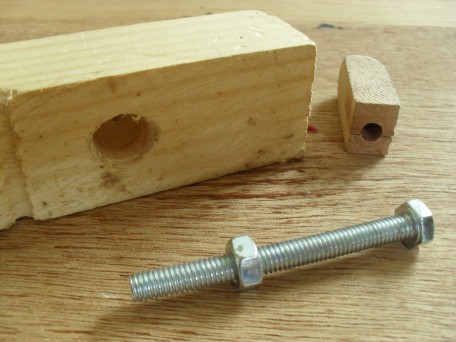
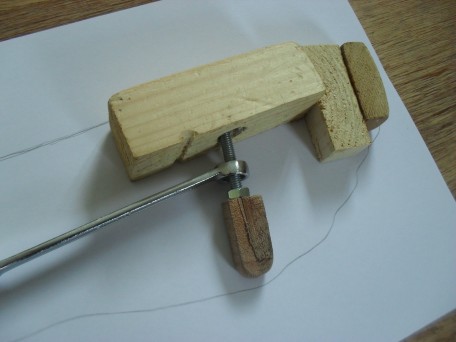
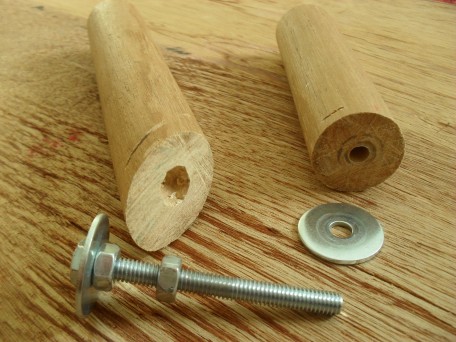
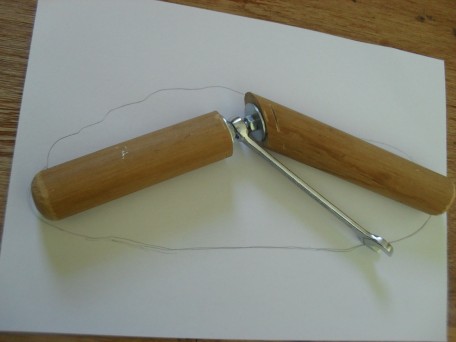
There are no affordable tools available to buy, so you will have to make your own. I have found that a nut and bolt between two suitably shaped pieces of wood can make a functional stretching tool. Use a spanner inside the boot to extend the tool. A ring spanner can make it easier to locate onto the nut. Professional tools use a small hydraulic ram between shaped metal blocks.
There's a nice tool available from Patriot Footbeds that uses a welding clamp to make a punch tool.
Different types of plastic require slightly different temperatures to stretch/punch, and some (e.g. Pebax) are difficult to get to hold their shape. Take extra care with very thin shells. Dual-injected shells (with two different types of plastic) require great care if the stretch/punch is near the boundary between the plastics – they can easily split at this point. It might be best to avoid trying to stretch/punch a dual-injected shell on this boundary.
You can create space by removing some plastic from the inside of the shell. This is not reversible, so make sure that you are sure about it before you start. Obviously thicker areas of the shell are more suitable for grinding than thin-walled areas. You can use calipers to assess shell thickness, or by shining a light through the shell – the light will show through more in the thinner areas.
Some types of plastic (e.g. Polyolefin) do not grind well. This is used in cheaper boots and is softer than other plastics – you can make a scratch in it with your fingernail. If you have Polyolefin boots, it might be best to avoid trying to grind them, and stretch/punch them instead.
You can also modify the liner to give more space for your foot. Gentle heat and a broom handle can be used to expand it.
Some ski boots are now made from a type of plastic that softens at a lower temperature, so you can heat the whole shell in an oven, step into it and buckle it, and use your foot (with padding on selected areas) as the tool to deform the shell. Advantages of this are that it is quick, easy, and addresses all tight spots at once. Disadvantages are that it molds the whole of the shell so may lose some closeness of fit in areas you don't want to expand – if you wish to avoid this then you can still do a normal localised stretch/punch on a heat-moldable shell instead of heat-molding it. Heat-moldable plastics soften at a lower temperature than normal plastics (80–120°C – see link below for per-brand values).